Understand the concept of the ‘box model’ in positioning and styling elements on a web page.
Apply properties and values in CSS for three components of the box model: padding, borders and margins.
You can view a finished version of the web page you will create in this Tutorial by clicking the link below. The finished sample will open in a new tab of your web browser.
On a web page, every element can be considered as a rectangle or more simply as a ‘box’
An element could be a heading, text paragraph, image, video or whatever. HTML elements consist of some content inside HTML markup tags.
The following are all examples of HTML elements. They have both content and markup tags.
The words box model are used when describing the layout and visual design of HTML elements in a web page.
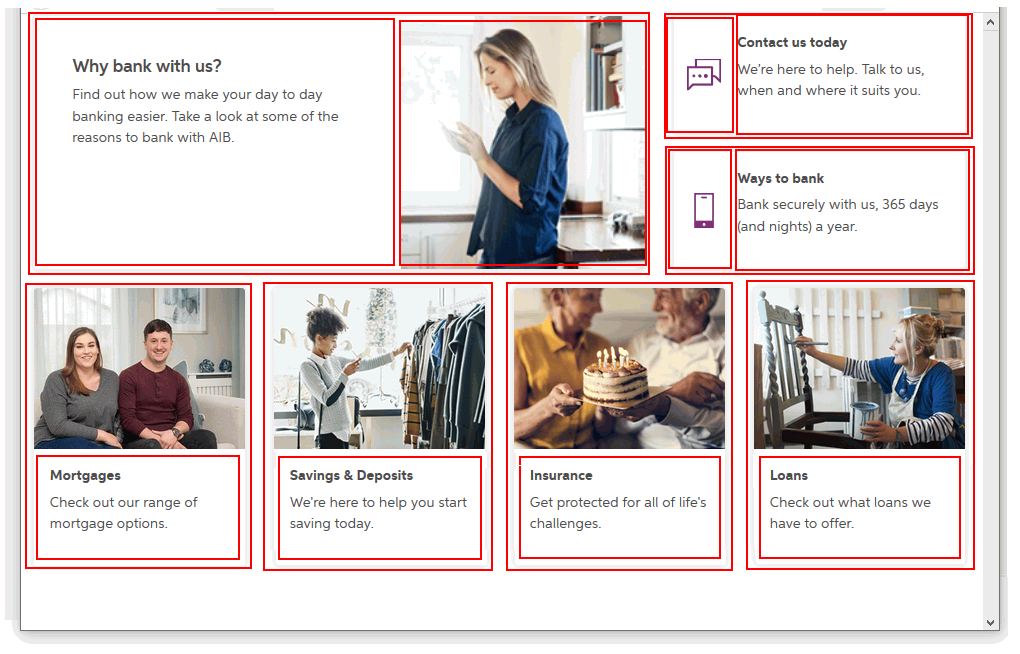
You can see an example of the box model in action by inspecting the home page from of AIB bank website. Notice how various page elements are grouped into rectangular blocks.
To sub-divide web page content into a layout of boxes, the HTML tag pair most commonly by web designers is the <div> ... </div> tag.
The above AIB home page contains 364 div elements.
Each of these grouping div elements and the smaller elements they contain follows the rules of the ‘box model’.
Downloading your sample files
Your first step is to download the files you need for this and the next two Tutorials.
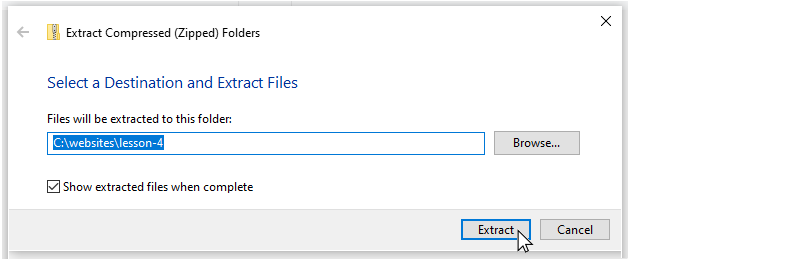
The files will unzip into a sub-folder of your websites folder named lesson-4.
You should see eight files: three HTML files, three CSS files and two image files.
sandbox-divs.html sandbox-divs.css page-9.html style-9.css page-10.html style-10.css student-computer-screen.jpg three-staff.png
Copy all eight files from the lesson-4 sub-folder into your main websites folder.
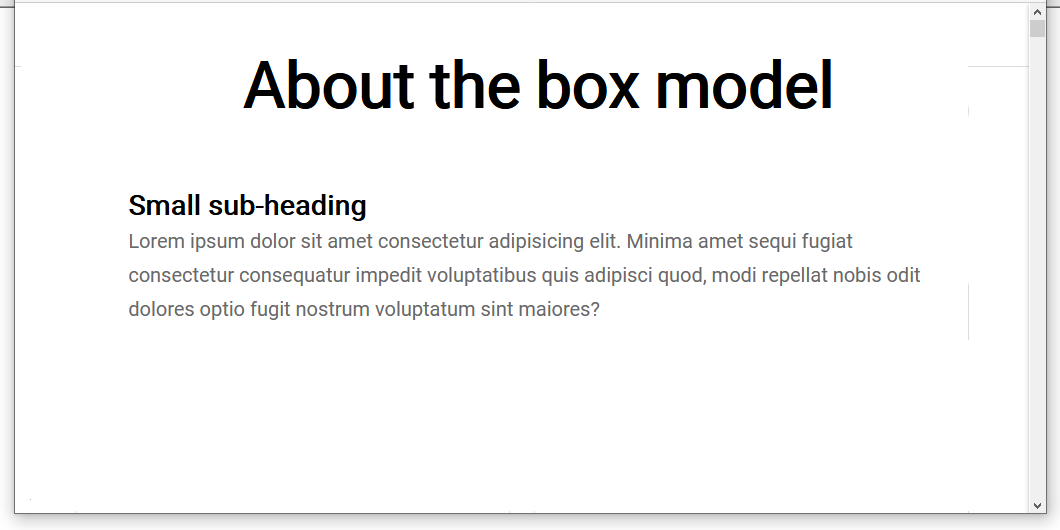
Display the sandbox-divs.html web page in your Chrome or Mozilla Firefox Developer Edition browser. It should look as shown below.
You can now delete the following two items from your websites folder:
lesson-4.zip: This is the compressed file you downloaded. You no longer need this file and can remove it.
lesson-4: This is the sub-folder within your websites folder that was created when you unzipped the compressed file. You no longer need this sub-folder and can remove it.
The box model and the <div> tag
You are now ready to work with your downloaded sample files.
Start Visual Studio Code, and then open the following two files:
sandbox-divs.html sandbox-divs.css
In the web page file, you can HTML tags for three elements: a main heading, a sub-heading and paragraph text.
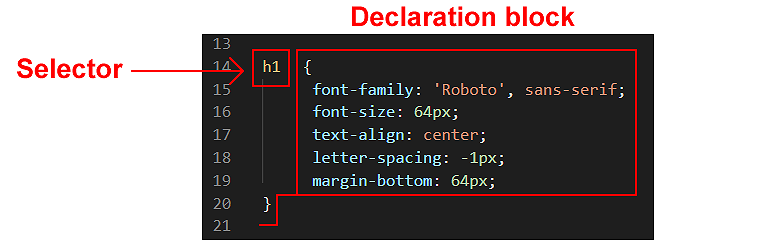
In the stylesheet file, you can see selectors and declaration blocks for elements from the web page. Below is the first of these three.
At the top of the CSS file are two lines of web browser resets. The second controls the display of images.
The first sets to zero all values of three properties that are particularly important when designing with the div tag: margins, paddings and borders.
The final property and value pair on this first line, box-sizing: border-box will be explained later in this Tutorial.
Switch back to the HTML file, and add the following opening and closing div tags as shown below.
Ensure you use the Tab key to indent the elements inside the div tag from the left edge of the Visual Studio Code window.
When finished, save your sandbox-divs.html file and view the result in your web browser.
As you can see, adding a pair of <div> ... </div> tag has no effect on the layout or visual appearance of a web page.
For this reason, the <div> tag in HTML is known as a ‘style-less‘ or ‘naked’ tag.
For the <div> element in the web page, let’s add a selector, and a background-color property and value.
Switch back to the CSS file, and copy-and-paste the following new comment line, selector and declaration at the bottom of the stylesheet.
/* Div selector with properties and values */div {
background-color: deeppink;
}
When finished, save your sandbox-divs.css file and view the result in your web browser.
The <div> element now has a deep pink background colour. Notice that no other part of the web page is affected. Only the <div> and its content.
Now we can move on to explore the three important div properties: padding, border and margins.
The padding property
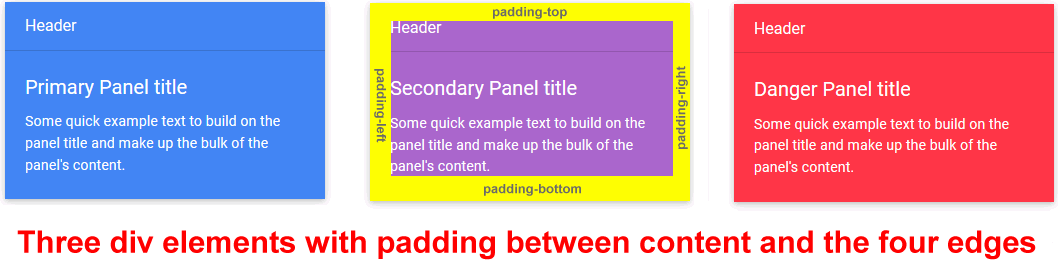
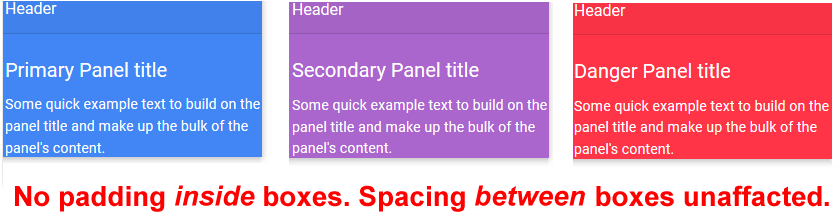
Padding is the spacing between the content of an element and its four edges – top, bottom, left and right. You can think of padding as an element’s inside spacing.
Padding does not affect the spacing between an element and any other elements around it. See the examples below.
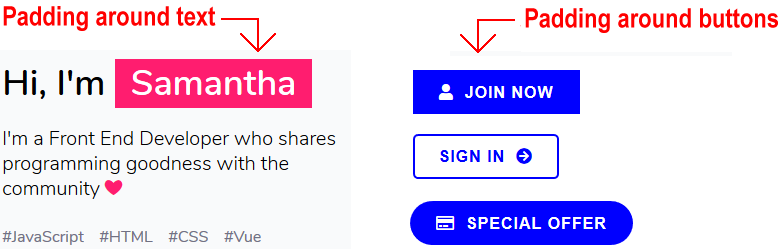
Padding is not just for div elements. You can also add padding around text and buttons.
Let’s add some padding to the four sides of your sample div element by copying-and-pasting the following.
When finished, save your sandbox-divs.css stylesheet and view the result in your web browser.
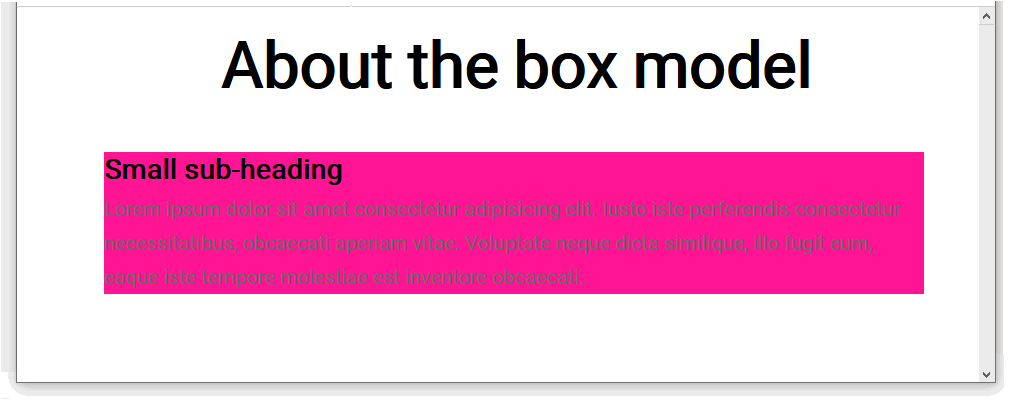
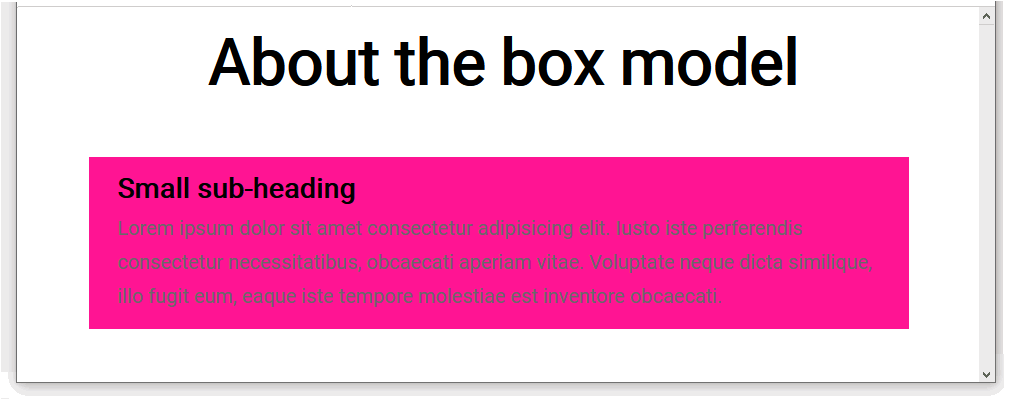
The <div> element in your web page now has some padding between its content and the four edges of the div.
CSS shorthand format
In the above simple example, all four padding values have the same value of 16px. So you can rewrite the four padding style rules into one CSS shorthand rule as follows.
div {
    background-color: deeppink;
    padding: 16px;
}
But sometimes padding values may be different on different sides of an element. For example copy-and-paste the following to your CSS stylesheet.
Is there a shorthand way of entering four different padding values for an element?
In CSS shorthand format, you could rewrite these four style rules on a single line as follows.
padding: 12px 32px 14px 16px;
But which one these four values refers for the top edge of the element? Or for the left edge?
The TROUBLE mnemonic
Web designers rely on a memory trick or mnemonic to help them remember which edges of an element are set by four padding values written on a single line.
The mnemonic is the word TROUBLE.
Or:
T(op), R(ight), OU B(ottom) and L(eft) E.
In your stylesheet, replace any text you have entered for the div selector with the following, more simple values. And then save the file.
div {
    background-color: deeppink;
    padding: 16px;
}
Next, let’s explore the border property of a <div> element.
The border property
Optionally, you can add borders to a <div> or other element. A border has three sub-properties as follows:
border-style (typically, solid)
border-width (can be measured in pixels)
border-color (colour name, RGB or hex code)
Let’s add four borders to our sample div selector. Copy-and-paste the following to your stylesheet.
You can see that the borders have the same width on all four sides. So, for the div selector, you can rewrite the four border-width lines on a single line as follows.
You can further shorten the three lines of border properties and values as follows.
div {
padding: 12px;
border: 4pxsolidgreen;
}
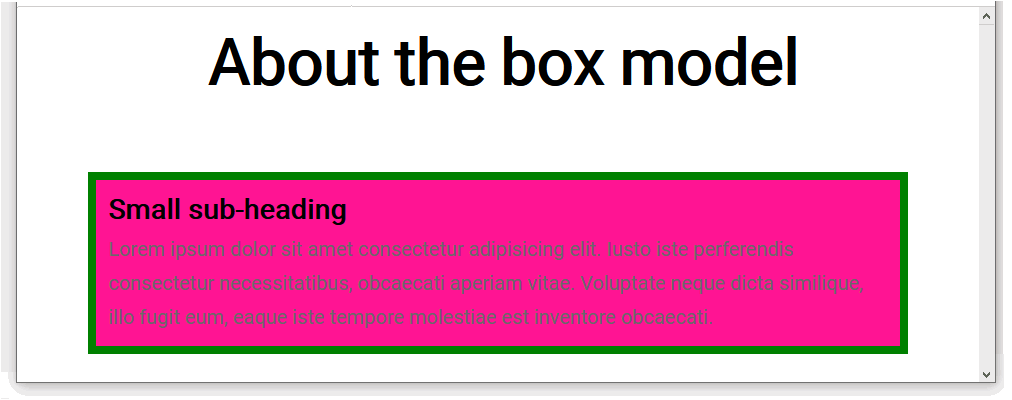
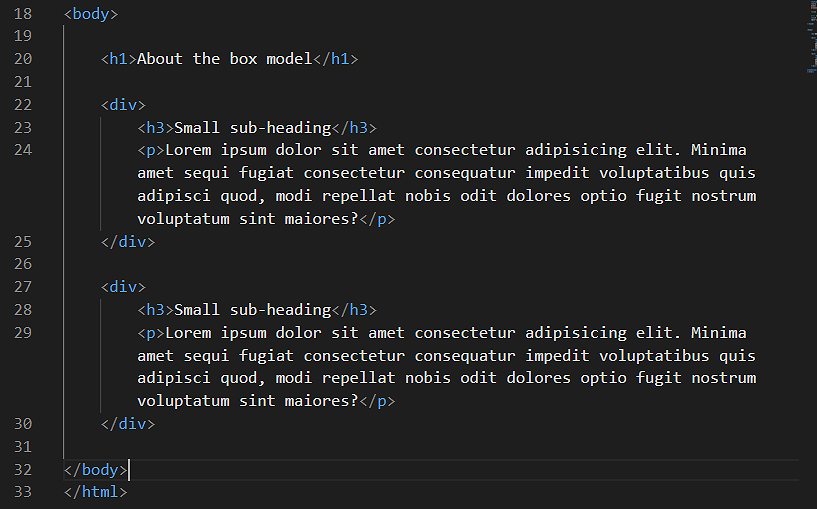
When finished, save your sandbox-divs.css stylesheet and view the result in your web browser. Your web page should look as shown below.
The box-sizing property
Consider the following example, where you give a box a fixed width of 300px. The box also has a padding on all four sides of 10px and a border width of 2px.
How wide is the box?
By default, the web browser will calculate and display the box width as follows:
300px + two sides of padding (20px) + two sides of borders (4px) = 324px
To ensure that the width of a box is exactly as you set it, include this property and setting in the web browser resets at the top of your CSS stylesheet file.
box-sizing: border-box;
The margin property
Margins are the spacing between an element and other elements around it. You can think of margin as an element’s outside spacing.
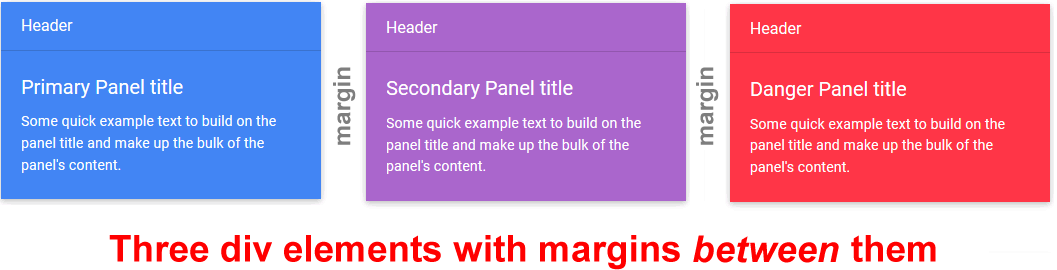
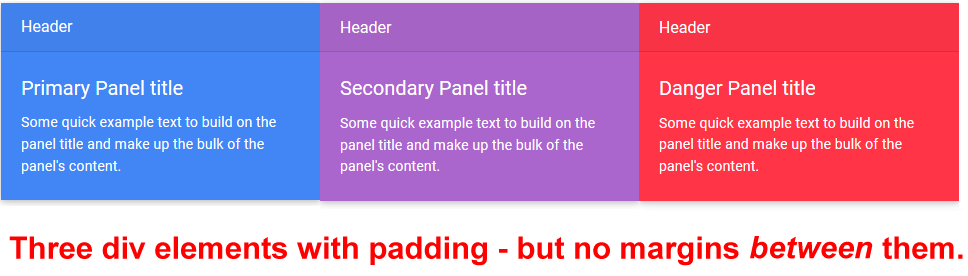
The greater the margin values of an element, the further it ‘pushes’ or ‘shoves’ other elements away from it. If div elements on the same web page had no margins, they would be no space between them. See the example below.
Let’s add some margins to our sample div element.
In your sandbox-divs.html web page, make a second copy of the <div> element as shown below.
Switch to your CSS file, and copy-and-paste the following.
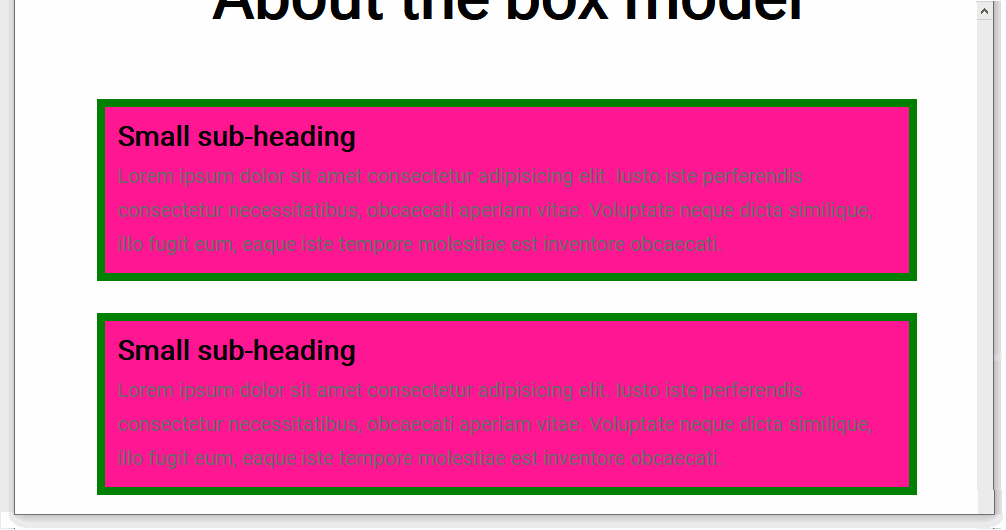
In the above example, the top and bottom margins each have a value of 32px. And the left and right margins are zero.
As a general rule web designing web pages with <div> elements, you will most commonly set bottom margins, then top margins and rarely left and right margins.
When finished, save your sandbox-divs.css stylesheet and view the result in your web browser. Your web page should look as shown below.
Margins can have negative values
Unlike padding values and border width values, margins can have negative values.
For example, copy-and-paste the following to line to the bottom of the div declaration block in your stylesheet and save the file.
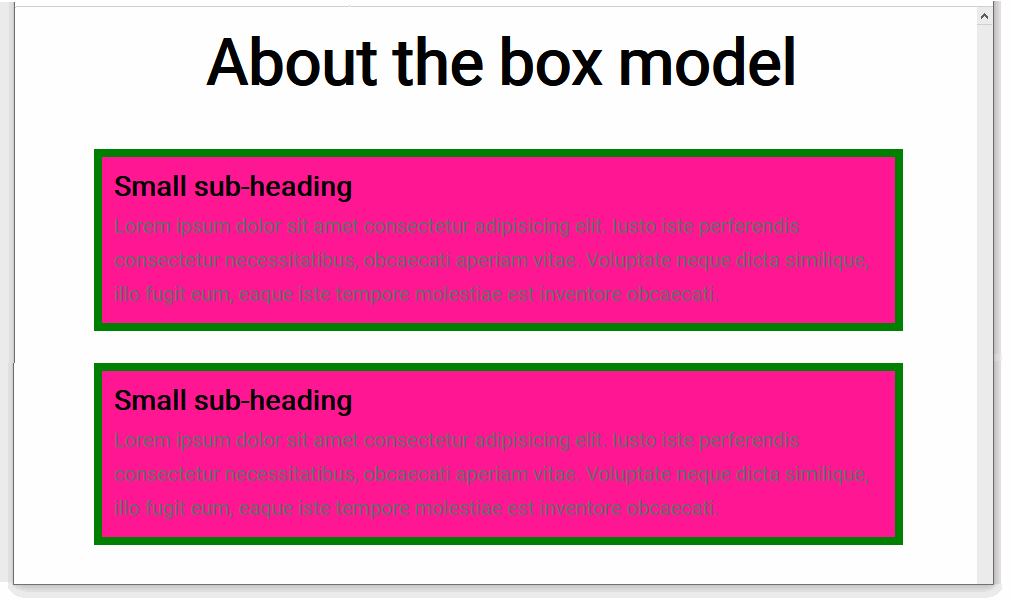
margin-left: -600px;
View the result in your web browser. It should look similar to that shown below.
You can now remove this negative margin.
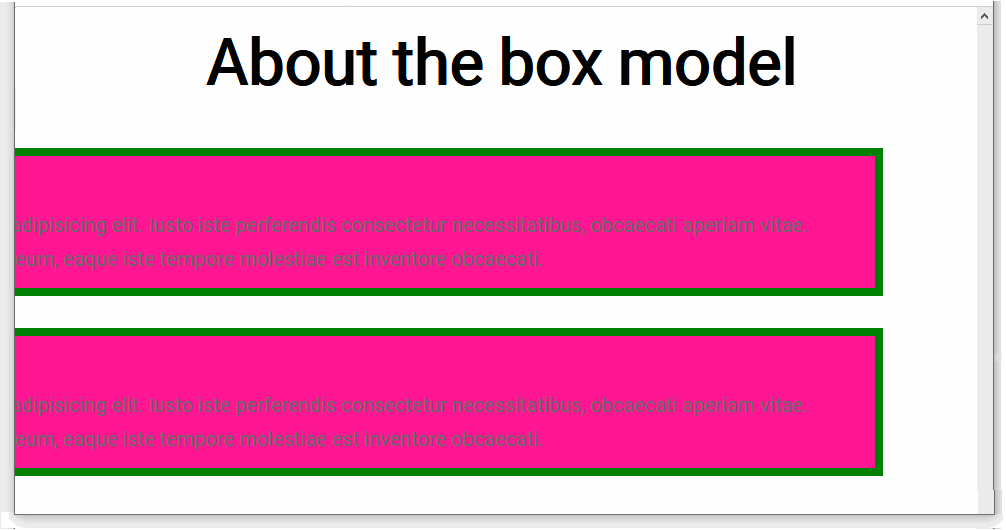
Next, add the following new line to the bottom of the h1 declaration in your stylesheet and save the file.
margin-top: -120px;
Your web page should now look as follows.
You will find negative margin values a useful feature when designing the layout of web pages.
You can now remove this negative margin property and value, and resave your stylesheet.
Working with classes and class names
Modern web pages typically have many dozens of <div> elements within them.
Some <div> elements will share common properties.
Other <div> elements will be very different from one another.
To design such modern web pages, you need to assign what are called classes to your <div> elements.
In effect, a <div> with a class is a version of a <div>.
Other HTML elements can have classes too.
You assign classes to <div> element in a web page by giving them class names. Below you can see some examples below of class names assigned to opening <div> tags in an HTML file.
Here are the rules about class names:
Class names are entered within a pair of double quotes ("").
Class names cannot have a space within them. You can type the hyphen (-) character to join words.
An element can have more than one class name assigned to it. Separate the different class names with a single space.
If an element has more than one class name, the order of the names is not important.
Styling with parent-child selectors
Next, you will apply styles to <div> elements with different class names.
In VS Code, open your divs-sandbox.html web page.
You can delete all the current content within the page <body> and replace it by copying-and-pasting the following.
<divclass="bono">
<h3>Bono</h3>
<p>Lorem ipsum dolor, sit amet consectetur adipisicing elit. Eius corporis obcaecati perferendis fuga quidem ad alias debitis excepturi ipsa laudantium sapiente.</p>
</div>
<divclass="edge">
<h3>Edge</h3>
<p>Lorem ipsum dolor, sit amet consectetur adipisicing elit. Eius corporis obcaecati perferendis fuga quidem ad alias debitis excepturi ipsa laudantium sapiente.</p>
</div>
<divclass="adam">
<h3>Adam</h3>
<p>Lorem ipsum dolor, sit amet consectetur adipisicing elit. Eius corporis obcaecati perferendis fuga quidem ad alias debitis excepturi ipsa laudantium sapiente.</p>
</div>
<divclass="larry">
<h3>Larry</h3>
<p>Lorem ipsum dolor, sit amet consectetur adipisicing elit. Eius corporis obcaecati perferendis fuga quidem ad alias debitis excepturi ipsa laudantium sapiente.</p>
</div>
You now have four <div> elements, each with its own class name. Save your web page.
Switch to your divs-sandbox.css stylesheet.
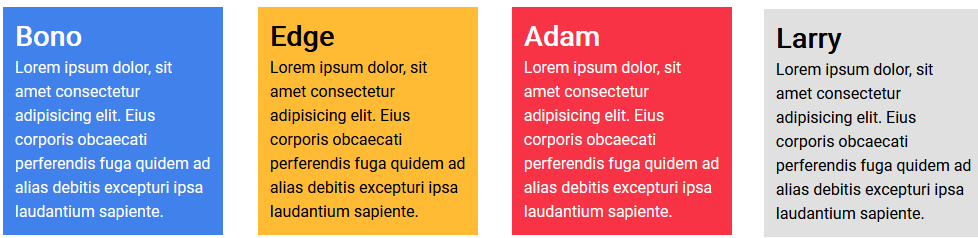
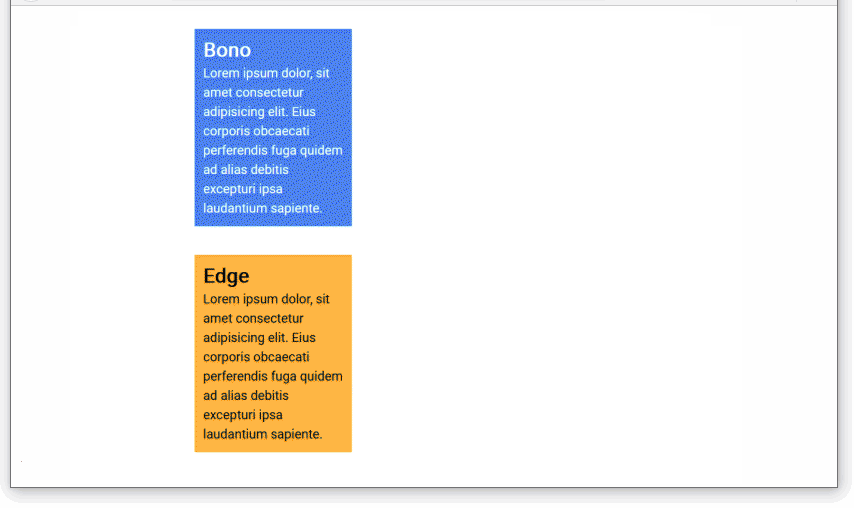
The visual design effect you want to achieve is as follows:
You want each of the four elements to have a different background colour.
You want two of the four elements to have dark text, and two light text.
All four will have the same padding values. They will have no borders.
The sub-headings and text paragraphs in all four elements will have the same font-family, font-size and font-weight.
See the example below. (The elements are shown left-to-right for space reasons. In your web browser, they will appear stacked top-to-bottom.
In your divs-sandbox.css stylesheet, for the h3 sub-heading selector, reduce the margin-bottom value to 2px.
For the p paragraph selector, reduce the font-size value to 16px and the line-height value to 1.5.
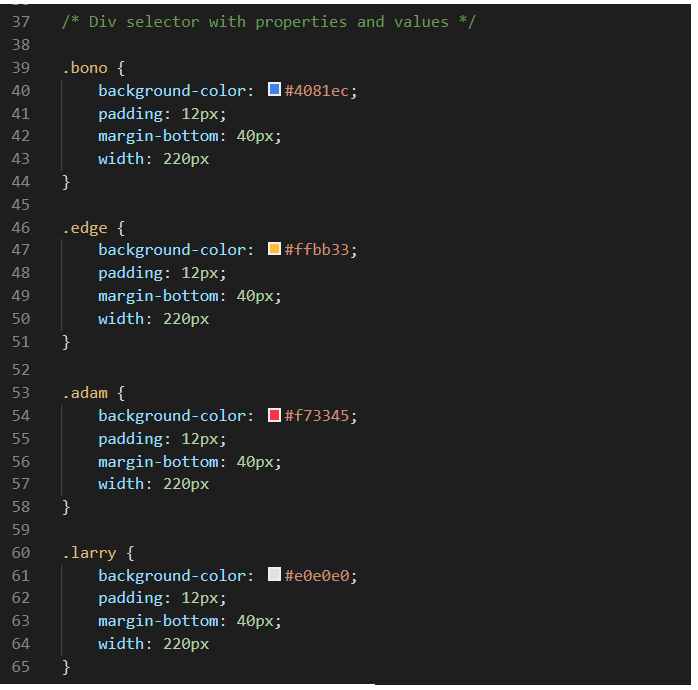
Next, replace the current div selector and declaration by copying-and-pasting the following.
The CSS selector div.bono applies to web page content inside a <div> tag pair with a class name of "bono".
Only a div element with this class name will be affected by the style rules within the div.bono declaration.
Similarly, the <div> element in the web page with a class name of edge will be styled by whatever rules are within the div.edge declaration block in the CSS file.
You don’t actually need to include the ‘div’ prefix in front of the four selectors in the CSS file. So you can remove them.
The four selectors in your CSS file and their style declarations should now look as shown below.
Next, let’s apply colours to the sub-headings and paragraphs within the <div> elements
At the bottom of the stylesheet file, copy-and-paste the following.
When finished, save your sandbox-divs.css file and view the result in your web browser.
Click sandbox-divs.html to view a finished sample of this web page in a new tab of your web browser.
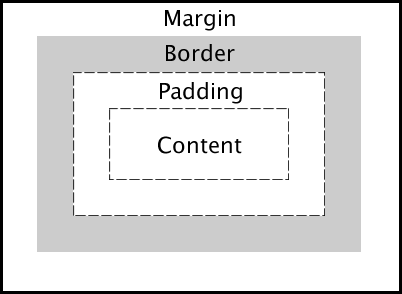
The box model: an overview
The four components of a web page element
In the box model, every HTML element can be viewed as containing the following items:
Content: The content of the box. This could be text, images, videos, icons and so on.
Margin: You can think of this as the box’s outside spacing. Margins separate the box from any surrounding elements on the same web page.
The greater the margin values of a box, the further it ‘pushes’ or ‘shoves’ other elements away from it.
Border: Optionally, you can add borders to any box, using your chosen colour, thickness and style.
Padding: You can think of this as the box's inside spacing. You will typically set padding values where you want to add some spacing between the content of a box and its four edges - top, bottom, left and right.
For padding, borders and margins, you can use the same value for all four box edges, or assign different values to each individual edge.
Uploading your files to GitHub
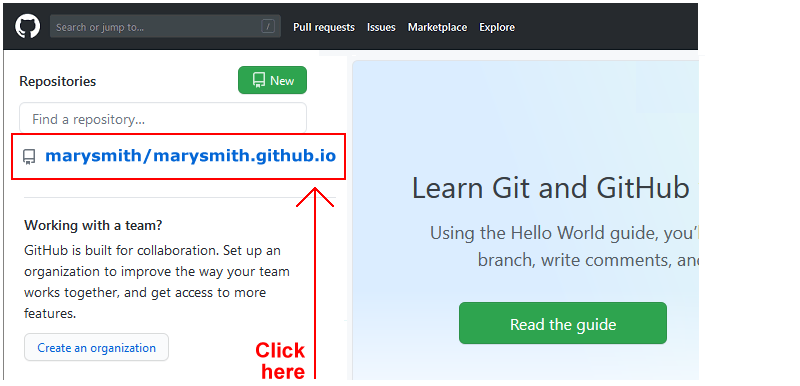
Open a new tab in your web browser and go to GitHub.com. If you are not already signed in to your GitHub account, sign in now.
On your GitHub home page, click the name of the repository (‘repo’) that holds your web pages. Its name will look as follows, where username is your chosen username on GitHub.
username.github.io
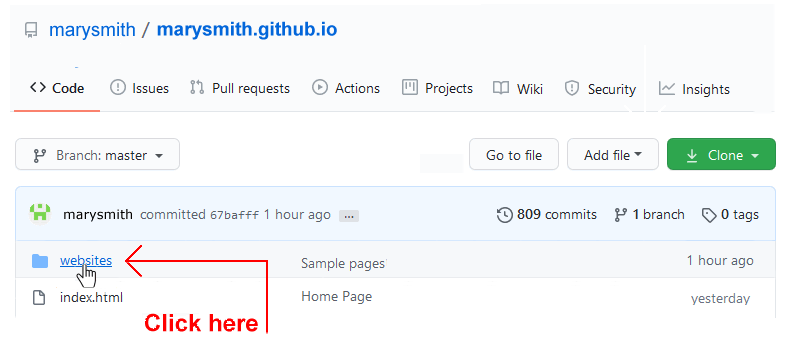
On the next GitHub screen displayed, click the websites folder. This is where your sample web pages, stylesheets and images are contained.
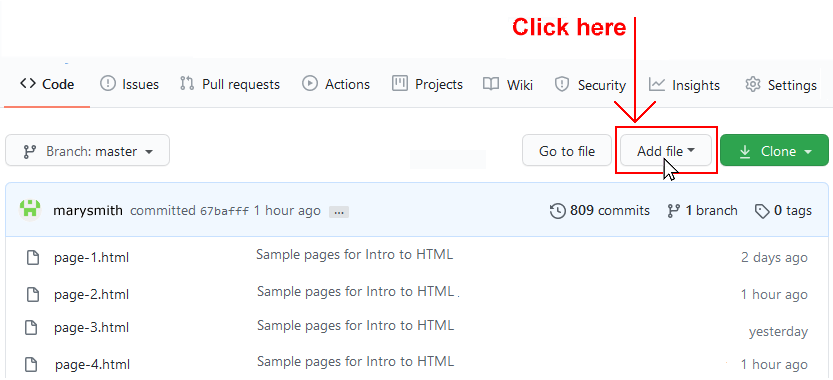
On the next GitHub screen, click the Add file button.
From the dropdown list displayed, choose the option Upload files.
Select or drag-and-drop the following web page and stylesheet to upload them to the websites folder of your GitHub account:
divs-sandbox.html divs-sandbox.css
Finally, scroll down to the bottom of the GitHub screen, accept or edit the short message (Add files via upload) in the Commit changes box and click the Commit changes button.
Your web page is now published on GitHub at a web address similar to the following, where username is the username you have chosen for your GitHub account:


 At the top of the CSS file are two lines of web browser resets. The second controls the display of images.
 The final property and value pair on this first line, box-sizing: border-box will be
 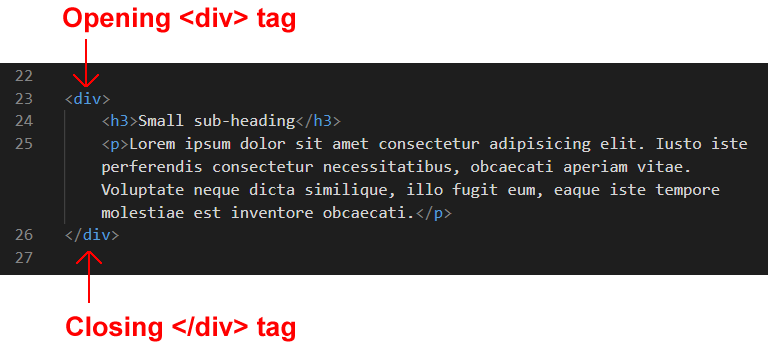 Ensure you use the Tab key to indent the elements inside the div tag from the left edge of the Visual Studio Code window.